Thursday, June 25, 2015

Crisp Zucchini Bites with Garlic Aioli Dip

After my fiasco with bread-frying tortellini I was very hesitant to give the recipe from Natasha's Kitchen a try. However I had been planning this one for a while and my family was fairly exited.

The zucchini bites turned out to be much easier to make than the tortellini. They were also quite delicious. When combined with the garlic aioli sauce they were exceptional.

It is a good amount of work for a side dish, but a few bites go a long way. Each of us only ate about half of the amount of zucchini we usually have.

This is a nice veggie side dish in that it is simple enough it can compliment a main dish, yet also complex enough to balance out a more simple meal.

What You Need
Zucchini Crisps
  • 2 medium zucchini, sliced 1/2 inch thick
  • 1/2 cup all-purpose flour
  • 2 eggs, beaten
  • 1 1/2 cups Panko Bread Crumbs
  • Oil for sautéing

Garlic Aioli Sauce
  • 1/3 cup mayonnaise
  • 1 garlic clove, pressed
  • 1/2 Tbsp lemon juice
  • 1/4 tsp salt

How You Make It
Aioli Dip
1. In a small bowl, combine all ingredients.

2. Allow to sit while preparing the zucchini bites.

Zucchini bites
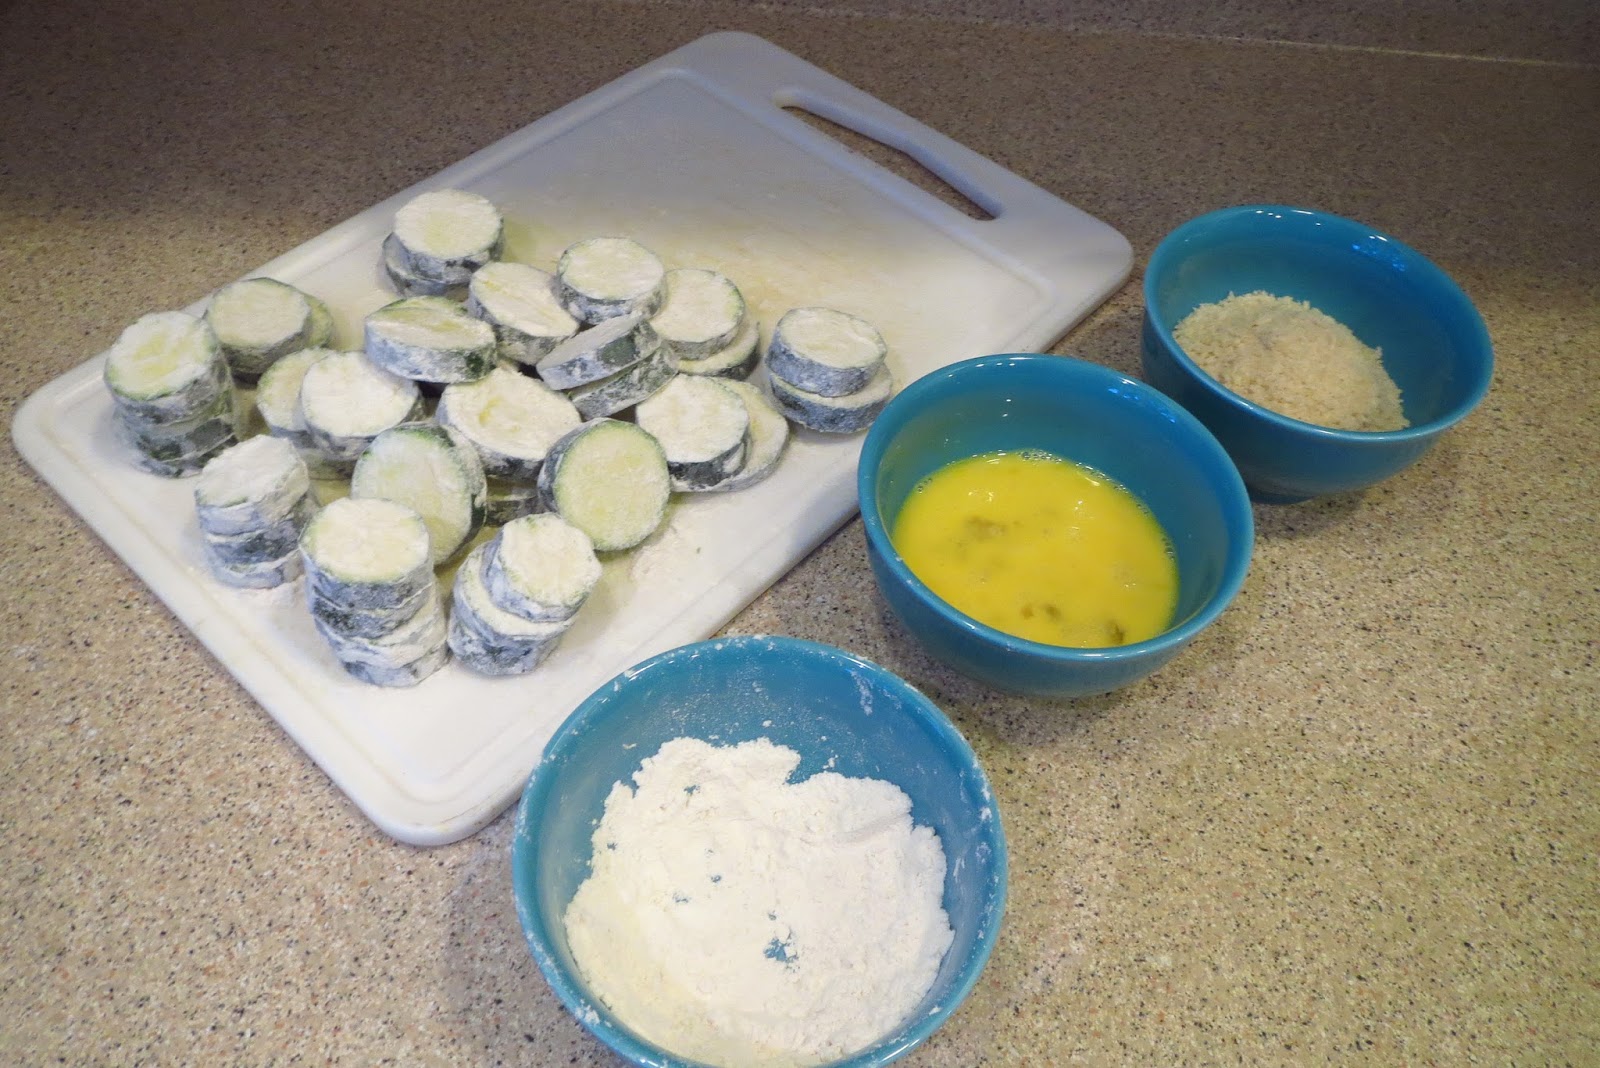
1. Prep three bowls:

1st bowl - mix flour, salt and pepper

2nd bowl - beat eggs with a fork

3rd bowl - panko bread crumbs

2. Dredge all sides of zucchini chips in flour.

3. Dip floured zucchini in egg mixture until completely coated

4. Coat both sides of zucchini with bread crumbs.

5. Heat a large, non-stick skillet over medium heat and add about ¼ inch oil.

6. Once the oil is hot, add breaded zucchini chips.

7. Sauté 3 minutes per side or until golden brown on each side.

8. Once zucchini are done frying, transfer to a plate lined with paper towels .

9. Serve warm with aioli sauce.


Formatted PDF of Recipe

Pesto Pan-Fried Chicken

I have two warnings about this recipe: expect to have quite a mess in the kitchen and expect to be begged to make it again. This may be one of the most labor intensive recipes I make, but it is worth every second.

I’ve said it before and I’ll say it again; pesto is one of the most delicious tastes I know. Combine it with frying and it's explosive.

When I found this recipe in a cookbook years ago I had no idea just how much my family would come to love it.

I suggest serving this with side dishes that won't try to overpower or compete with the chicken. For our Father's Day dinner this year I chose quinoa and Dad's favorite, corn.

What You Need
  • 4 boneless skinless chicken breasts
  • 1/3 cup pesto
  • 1/2 cup flour
  • 1 egg, beaten with 1 Tbsp water
  • 2/3 cup Italian bread crumbs
  • 1/4 cup grated parmesan cheese
  • 3 Tbsp olive oil


How You Make It
1. Preheat oven to 300*F.

2. Place chicken breasts between sheets of plastic wrap and pound to an even thickness of about 1/4".

3. On four plates lay out pesto, four, egg and bread crumb/cheese mixture.

4. Coat chicken with pesto. I do this with my hands, it ends up being a lot easier.

5. Cover with flour.

6. Drench in egg mixture.

7. Lastly roll in bread crumb/cheese mixture until completely covered.

8. In a large nonstick pan heat 2 Tbsp oil over medium heat.

9. Add chicken and cook about 2 minutes on each side until coating is golden brown and chicken is cooked through.


10. Remove to a baking sheet lined with paper towels, keep warm in oven.

11. Add more oil as needed during frying.


Formatted PDF of Recipe


Baked Parmesan Garlic Chicken

This is a regular in our house. The easiness to deliciousness ratio for this recipe is incredible. This is also a perfect main dish to go with some of the more extravagant or rich side dishes.


What You Need
  • 1/2 cup grated Parmesan cheese
  • 1 Tbsp Herbs de Provence
  • 1/2 teaspoon garlic powder
  • 6 boneless skinless chicken breast


How You Make It
1. Preheat oven to 400*F.

2. Mix cheese, herbs and garlic powder.

3. Moisten chicken breasts with water; coat with cheese mixture.

4. Place in shallow baking dish.

5. Bake 20 to 25 min. or until chicken is no longer pink in the center.


Formatted PDF of Recipe

Lemon-Ricotta Pasta with Seared Scallops

After watching Hell’s Kitchen and see everyone mess up scallops, I figured I’d have my go at them. Crumb had what seemed like an easy enough recipe for a newbie scallop chef. I will honestly say that I didn’t do much better than the people on the show. The lemon ricotta pasta was pretty good. Although I was not particularly a fan of the texture the ricotta gave to the pasta.

Overall, my family really enjoyed the dish, even though the scallops weren’t entirely cooked properly. Based on how expensive scallops, the difficulty in cooking them and my personal dislike of the ricotta pasta texture, this recipe will not be repeated in this California kitchen.

I don’t however discourage others from trying it. As I said, others liked it despite the slightly underdone scallops. I can only imagine how much they would have loved it if the scallops were cooked to perfection.

What You Need
  • 1 box fettuccine pasta
  • 12 large fresh sea scallops
  • 4 Tbsp olive oil
  • 1 Tbsp butter
  • Zest of 1 lemon
  • 1/4 cup lemon juice
  • 4 Tbsp fresh thyme, minced
  • Sea salt
  • Ground black pepper
  • 1 tub (475g) ricotta cheese

How You Make It
1. Cook the pasta per package directions until al dente.

2. Rinse scallops and pat dry. Sprinkle with salt and pepper.

3. In a skillet heat butter and 1 Tbsp olive oil and butter over high heat until foamy.

4. Place scallops in skillet in single layer.

5. Cook, turning once, until brown on outside and just opaque in center, about 2 minutes per side.

6. Remove from pan and set aside.

7. Drain pasta and return to the pot over low heat.

8. Stir in lemon zest, juice, remaining 3 Tbsp olive oil, and thyme.

9. Toss to coat and season with salt and pepper.

10. Gently mix in the ricotta until pasta is coated evenly.

11. Divide pasta between four plates and serve with three scallops on top.


Formatted PDF of Recipe


Monday, June 22, 2015

Chocolate Chip Buttermilk Scones

These are absolutely delicious! Extremely easy to make the dough. Only issue was the dough was excessively sticky. I used a scone pan and the stickiness made my hands a mess. I can’t imagine having to do this on a baking sheet.

Still well worth it in my book. These are a definite repeat.


What You Need
  • 3/4 cup buttermilk
  • 1/4 cup sugar
  • 2 tsp vanilla extract
  • 1 large egg
  • 2 cups all-purpose flour
  • 1 Tbsp baking powder
  • 1/2 tsp salt
  • 3 Tbsp butter, melted
  • 3/4 cup mini semi-sweet chocolate chips
  • 1 large egg white, lightly beaten
  • 1 1/2 Tbsp sugar


How You Make It
1. Preheat oven to 375*F.

2. In a medium bowl, whisk together the buttermilk, sugar, vanilla extract and egg.

3. In a large bowl, combine flour, baking powder and salt.

4. Mix in melted butter until the mixture resembles coarse meal.

5. Gently fold in chocolate chips.

6. Stir in milk mixture until just moist.


7. If using a scone pan: Divide up the dough into each of the spaces.

8. If using a baking sheet: On a floured surface knead lightly four times with floured hands. Form dough into a 9 inch circle onto baking sheet, about 3/4" thick. Using a knife, cut dough into 12 wedges.

9. Brush egg white over dough and sprinkle evenly with sugar.

10. Bake until golden, about 18-20 minutes.


Formatted PDF of Recipe


Buttery Basil Garlic Bread

This recipe was relatively easy and decently good. There are a few modifications I will be making in the future such as also adding in shredded Parmesan and mozzarella cheese.

My family really enjoyed this bread, but I personally still prefer the ItalianBread. Maybe combining the two in some way could make an even better bread! Will have to give it a try. Hope you enjoy this bread though.

What You Need
  • 2 Tbsp butter, melted
  • 2 Tbsp olive oil
  • 1 bunch basil leaves
  • 2 cloves garlic, minced
  • 1 loaf of French bread
  • 1 1/2 cup grated Parmesan cheese


How You Make It
1. Preheat oven to 400*F.

2. Combine all ingredients except the bread and cheese in food processor.

3. Process until smooth.

4. Season with salt and pepper.

5. Cut loaf of bread in half.

6. Spread both halves with the mixture.

7. Sprinkle Parmesan cheese over bread
8. Bake 5 – 10 minutes or until the cheese is melted and starting to get golden on top.


Formatted PDF of Recipe

Thursday, June 18, 2015

Mini Red Velvet Cheesecakes


First and foremost DO NOT MAKE THESE!!!! If you want red velvet cheesecake something make the Red VelvetCheesecake Swirl Brownies.

Not all recipes I try are winners, but this one doesn’t even place. These are a hassle to make and are not very good.
If you really want to give it a go though, here it the recipe…


What You Need
Red velvet cookie layer

  o 1 1/2 cups + 1 Tablespoon all-purpose flour
  o 1/4 cup unsweetened cocoa powder
  o 1 tsp baking soda
  o 1/4 tsp salt
  o 1/2 cup unsalted butter, softened to room temperature.


  o 3/4 cup packed brown sugar
  o 1/4 cup granulated sugar
  o 1 egg, at room temperaturea
  o 1 Tbsp milk
  o 2 tsp vanilla extract
  o 1 Tbls red food coloring


Cheesecake layer

  o 12 oz full-fat cream cheese softened
  o 2 Tbsp plain yogurt
  o 1/3 cup granulated sugar
  o 1 egg at room temperature
  o 1 tsp vanilla extract
  o 1/2 cup mini semi-sweet choco chips


 How You Make It
Make the red velvet cookie layer
Mix flour, cocoa powder, baking soda, and salt together in a bowl. Set aside.
Beat the butter on high speed until creamy.
Switch to medium speed and beat in the sugars until combined.
Beat in the egg, milk, and vanilla extract.
Once mixed, add the food coloring and beat until combined.
Mix the dry ingredients on low until a soft, sticky dough forms.
Press 1 Tbsp of dough into the bottom of each cupcake liner.
Bake at 350F degrees for 8 minutes to pre-bake the crust.
Make the cheesecake layer
Using a handheld mixer beat cream cheese on medium-high until completely smooth.
Add yogurt and sugar, beating on high until combined.
Add the egg and vanilla and beat on medium until combined. Try not to overbeat.
Gently fold in the chocolate chips.
Add 1 Tbsp of cheesecake batter on top of the pre-baked cookie.
Return to the oven and continue to bake for about 20 more minutes,
Cover with aluminum foil if the tops get too brown too soon.
They are ready when the cheesecake topping no longer jiggles when you shake the pan.
Cool for 30 minutes on the counter, then in the refrigerator for another 1.5 hours.